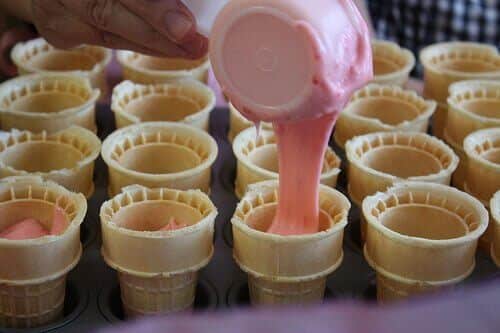
How to make cupcake cones

If you’re planning to make cupcakes for a party but want to make something more creative and interesting, making cupcake cones can be your answer! You can use store bought ingredients and have fun decorating them as you wish. Here’s how.
Supplies needed
- Cupcake mix
- Ice cream cones
- Electric hand beater
- Spout mixing bowl
- Cupcake pan
Directions
- Set up your ice cream cones in a cupcake pan, as in the picture above.
- In a bowl, beat together your wet ingredients and set aside.
- Add all dry ingredients into your spout mixing bowl, which will make for easy pouring later. You can use a fork to sift through the flour to make sure there are no clumps.
- Slowly add your wet ingredients to your dry ingredients in small batches, using your electric hand mixer to mix them together on low speed after each pour. Mixing in intervals will make sure there are less clumps and air bubbles in your mix.
- Once your mix is complete, begin pouring it into the ice cream cones only filling it up to the top of the stem. Do not pour above it into the cup of the cone, as it could overflow when baking.
- Place cupcake cones into the oven, and follow the baking directions on your cupcake mix package. To make sure cupcake cones are cooked through, you can use a fork or toothpick to poke them. If batter sticks to the fork or toothpick, it needs a few more minutes in the oven.
While regular cupcakes can be packed in plastic cupcake containers for transport, leaving your cupcake cones upside down (before decorating) in your cupcake pan and covered with foil will work and you can decorate them quickly on site. These are great because they fit any occasion and are fun for kids and children at heart!
