Handmade Christmas cards
Handmade Christmas cards – The holidays are coming quickly, there still some time left for Homemade Christmas crafts and cards! When I need to make a lot of cards, I like to pick a product that makes it easier to to choose the colors and design. It helps me speed up my creative process. This year I have created a number of cards using felt embellishments created by Pebbles Inc from the Welcome Christmas line. I have three cards to share using some of these felt embellishments.
Supplies you need for your Handmade Christmas cards: felt embellishments, white cardstock, 3-4 different sheets of patterned paper, rub-ons, favorite border punches, twine, a couple of brads and colored gems. I always have my paper trimmed, some sharp scissors handy as well as 3D foam pop dots handy.
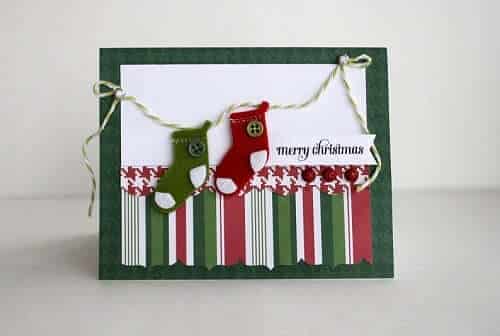
1. Create card base (5″x4″)
2. Cut piece of white cardstock (4.5″x 1.75″)
3. Run striped patterned paper through border punch and cut down (4.5″ x 1.5″)
4. Run red and white patterned paper through border punch and cut down (4.5″x .5″)
5. Adhere paper to card base as seen in picture.
6. Apply rub-on to bulk cardstock and trim (2″ x .5″), adhere using pop dots to card.
7. Add felt embellishment.
8. Add twine, brads and gems.

1. Create card base (5″x4″)
2. Cut out a 2.5″ circle of white cardstock (you can put the circle through an embossing machine and folder for more texture).
3. Run dark green patterned paper through border punch and trim down (4.5″ x 2.5″), adhere to card base.
4. Run striped patterned paper through border punch and trim down (4.5″ x 1″), adhere to card base over dark green.
5. Run twine across the top of the patterned paper and attach.
6. Wrap twine around the circle and adhere circle to the card using pop dots.
7. Apply rub-on to cardstock and trim (2″ x .5″).
8. Adhere felt to circle and adhere sentiment under felt embellishment.

1. Create card base (5″x4″)
2. Cut out white cardstock base (4.5″x 2.75″) and run through embossing machine for added texture.
3. Cut out a strip of red and white patterned paper (4.5″ x .25″ ).
4. Run striped patterned paper through border punch and trim (4.5″ x .5″)
5. Adhere white and patterned paper to card base.
6. Cut out 3 squares of white cardstock (1.5″ x 1.5″) and adhere to card using pop dots.
7. Apply rub-on to cardstock and trim (2″ x .5″).
8. Adhere felt embellishment, sentiment and gems to card.
Many thanks to Craft Corners for the invitation to post. Please do stop by my personal blog to see more of my cards and other creations (https://scropping.blogspot.com). You can always email me from there if you have any questions! Thanks for stopping in!
About the author:
Sarah Webb lives in Southwestern Ontario with her husband and two kids. She works full time in health. Creating with paper is one of her favorite ways to relax and have fun in the evening after the kids are in bed (she doesn’t watch TV!). She initially started out scrapbooking, but discovered in the last year or so, that cards are just as enjoyable. She has been very lucky to work with the Pebbles Inc design team over the last year and a half. Her creative journey has been fun!