DIY ChalkBoard Paint
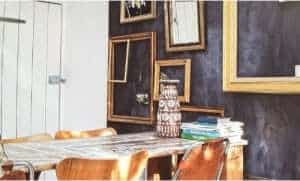
DIY ChalkBoard Paint – As seen in cute coffee shops and fun DIY projects, DIY ChalkBoard Paint has grown in popularity to create a rustic and creative vibe to any project, place, and items for décor. Once originated in the classroom, the chalkboard surface now gives a shabby chic effect to any room. The best part is that it can be used with many themes for many purposes to create an artistic environment for anyone willing to pick up a piece of chalk. Not to mention, it’s something that can keep your children entertained for hours on end.
As a delight as it is to see and use, the paint when bought over the counter can range a little higher in price tag with a quart going for as much as $25-$30. Lucky for us, we can save some money and even open up the color choices by simply making it on our own with an easy-to-do DIY tutorial.
In our sample, we have created our own smaller version of the photo above by applying the paint to the backing of an old picture frame.

Supplies for your DIY ChalkBoard Paint
– Low- Sheen or Flat Latex Paint in Any Color (Preferably one that is darker in hue, so that chalk can be seen)
– Un-sanded Tile Grout
– Paint Brush or Paint Roller
– Liquid Measuring Cup
– Table Spoon
– Empty mixing bucket or cup
– Stick/old spoon for mixing
– Sand Paper
– Newspaper
– A box of White or Colorful Chalk (or both!)
Preparation
1. Use the newspaper to cover your mixing area.
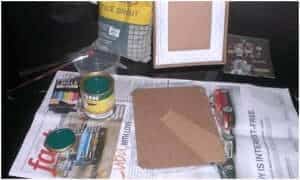
2. Depending on how big or small your project is the ratio of grout to paint is 2 Tablespoons of grout to 1 Cup of paint. In our example, we used half of the ratio which is great for small projects like this picture frame. (1 Tablespoon : ½ Cup Paint)
3. Pour the desired amount of paint and grout into the mixing bucket.

4. Use the stick or old spoon (a plastic spoon can be used as well) to mix the paint well until it is completely blended. Once this is done, your paint is ready to use!
5. Use the paint brush or roller to apply the paint mixture to the surface. Cover the entire surface with 1-2 coats of paint. Then allow it to completely dry.

6. Once it’s dry, run your fingers on the surface and feel how smooth it is. Depending on the type of grout used some can feel grainier than others. If you feel there is too much grain to the surface, simply use the sand paper and gently rub the surface until smooth.
7. Once smooth, your chalkboard is ready to be drawn on. Take any piece of chalk and let your creative juices flow!
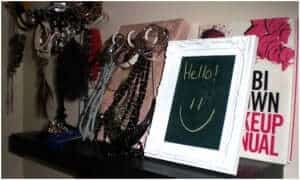
This is a fun way to repurpose old picture frames if you have any lying around the house. We used this board to write daily quotes, make to-do lists, and write short simple messages or reminders.
Extra DIY ChalkBoard Paint?
Ideas for Small Projects:
Wine Glasses – label names
Cheese trays – label different cheeses
Jars – label contents such as sugar, coffee, spices, and more.
Flower Pots – label vegetable or herbs
Ideas for Large projects:
Children’s rooms – apply on walls or doors for endless hours of fun
Kitchen walls – create a menu or make a list of groceries
Other Walls- create an accent wall and apply chalk typography or hang picture frames.
Tip: If you’re painting on a door or wall, apply a primer if the surface is glossy.
Project Photos Belong to C. Hiquiana